
How to Correct Hip Imbalance in Runners
The human body is designed to face challenges and accomplish what may, at times, seem like difficult feats. One of its many characteristics that makes this possible is resilience, which refers to the body’s ability to adapt itself to challenges to help you achieve your goals. This resilience of the body can also help in compensating for any biomechanical deficiencies or inefficiency in any area. However, if the biomechanical deficiencies are not corrected, over time, it can lead to issues such as imbalances, weakness in the area, muscle tightness, or injuries.
The hips are the focal point of a runner’s gait and are commonly affected by structural imbalance that can negatively impact your running. With the dynamic nature of the hips and having these many muscles involved, and working at high intensities for long durations, it is not surprising that hip imbalances are a frequent complaint among runners.
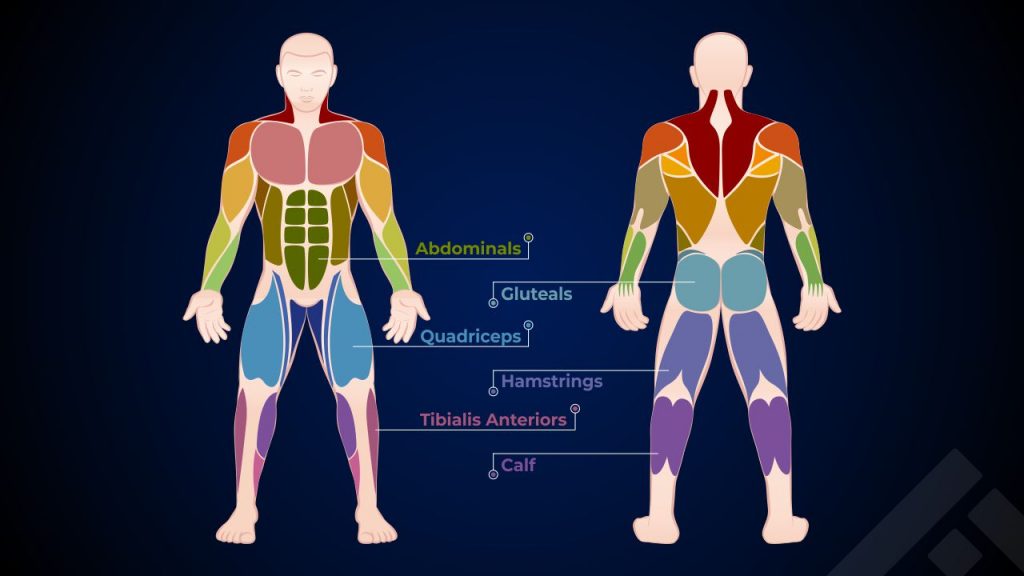
Hip muscles
Many muscle groups act at the hips. These include:
1. The powerful gluteal muscles and hamstrings serve as the primary drivers of hip extension.
2. The hip flexors on the front of the thigh and lower core help drive the legs forward.
3. The hip abductors on the outer thigh move the legs out away from the midline of the body.
4. The hip adductors on the inner thigh pull the legs in toward the body.
5. The deep muscles of the hip rotate your leg away from the midline of the body.
6. The muscles found on all sides of the hip joint, which help to rotate the leg toward the midline of the body.
These muscle groups work together to keep the hips level, balanced, and functioning optimally.
Running and hip imbalances
The running motion trains the hip flexors and extensors through a very narrow range of motion. This can lead to instability when you are forced to bring a knee up beyond its typical range of motion or thrust the hips forward in a way you are not accustomed. In other words, when a runner is forced by circumstance to move the hip in a new way, such as over an obstacle in their path or during a movement that they perform, which is not a part of their training regime, it may result in hip imbalances and lead to unbalanced running.
One common form of hip imbalance leads to a condition called a hip drop. This type of imbalance is more prevalent among women than men, as women generally have wider pelvises. It occurs when the muscles of the outer hips are not strong enough to keep the thighs vertical but are angled in toward one another, which may lead to an increased risk of injury over time.
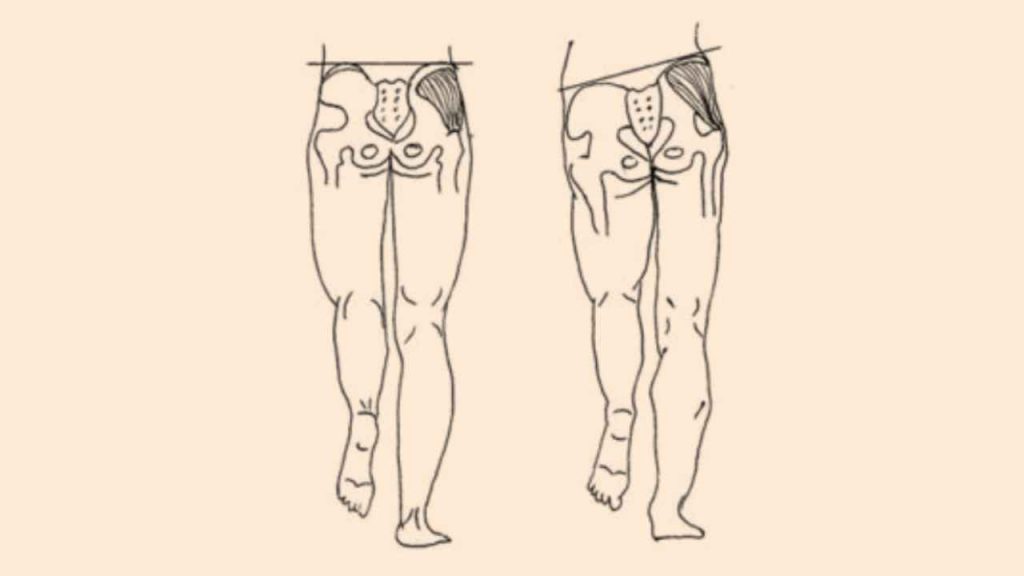
Hip drop can be seen when someone is standing on one leg and their pelvis tilts downward toward the leg that is being held in the air. This indicates a weakness in the hip abductor muscles, often the gluteus medius, which is the topmost gluteal muscle that connects to the top of the pelvis, and the gluteus minimus, which is the smallest of the gluteal muscles and sits below the other muscles.
Hip drop is most evident during the stance phase of running when one leg is holding the weight of the body as the other leg swings through to generate momentum for forward movement. So, a hip imbalance can result in reduced running efficiency and speed.
Signs of hip imbalance
The warning signs of hip imbalance might include:
1. One knee collapsing inward, which is typically caused by either gluteal weakness or poor foot mechanics.
2. Excessive pain on one side of the body, which can mean that something is off with your running technique.
3. Shin pain, which will develop into shin splints if ignored for too long.
How can you correct hip imbalances?
The importance of hip-strengthening exercises cannot be overstated. Gait is a deceptively complex process that combines hip flexion, adduction, internal rotation, external rotation, abduction, and extension — often in unison as well as in various combinations. This means that your training program should also target those muscles that drive that process and force them to move and function through the same complex movements.
Also read: Essential Balance Exercises for Runners
One way to prevent or manage injuries is by being in tune with your body and paying attention when it gives you signals to slow down or pull back on your training. Most running-related injuries are classified as overuse injuries. This means that they are caused by repetitive motion that uses the same muscles in the same way over long durations.
It may not be possible to prevent all injuries. However, if you pay attention to what your body is telling you, you may be able to minimize their impact or avert short-term issues from growing into long-term problems.
Strengthening exercises to correct hip imbalances
Adding some hip stretches and hip-strengthening exercises to your running program can prevent or manage hip drop and possibly help achieve hip-alignment correction.
Also read: Exercises to Train the Posterior Chain Muscles for Runners
You may perform two to three sets of 12 repetitions of the following exercises. Repeat these strengthening workouts on both sides.
1. Dirty dog
Here are the steps to perform this workout:
- Start on your hands and knees with your toes curled under and pointing toward your body. Your knees should be under your hips and your hands should be shoulder-width apart and facing forward.
- Stiffen your abdominal/core muscles gently to position your spine in a neutral position, avoiding any sagging or arching
- Exhale and gently lift one knee off the floor. While maintaining the bent-knee position, slowly rotate it externally outward and upward. Attempt to move the leg and minimize the rotation of your trunk.
- Hold this position briefly while keeping a stable trunk and head level with your spine. Then, slowly lower your knee back toward the floor.
- Take a short pause and repeat this exercise
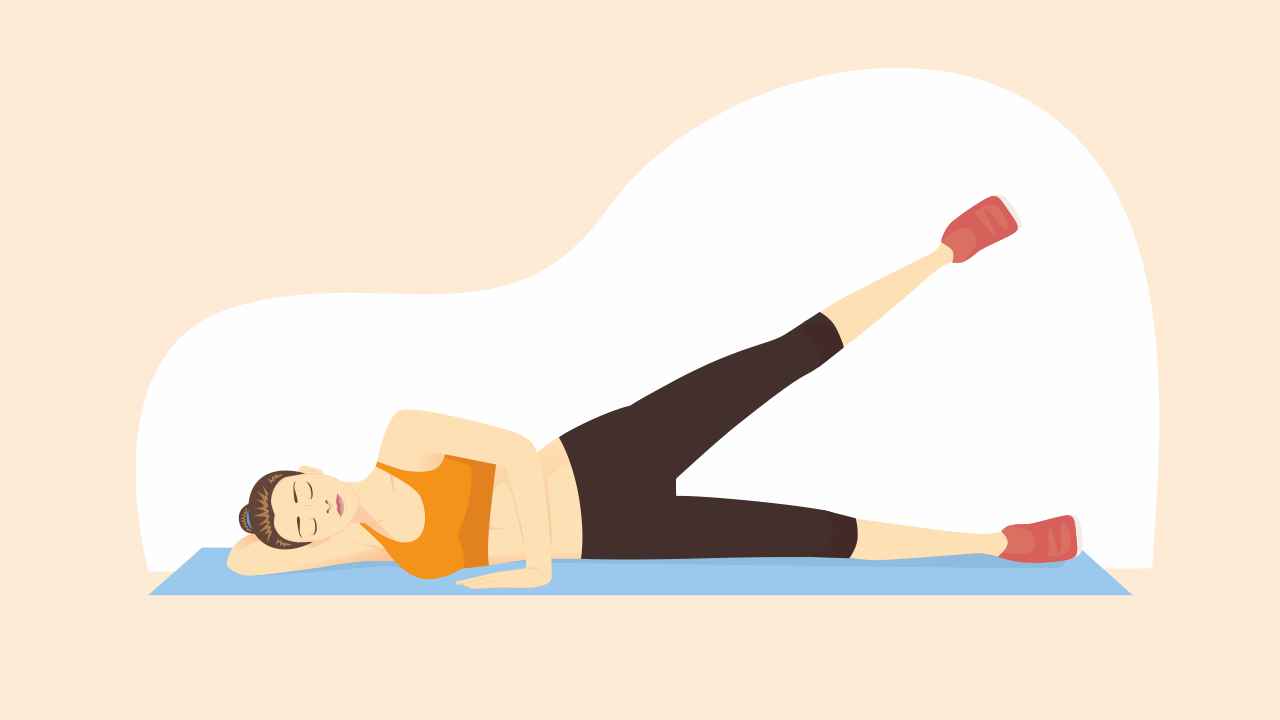
2. Side-lying hip abduction
Here’s how you need to do this exercise:
- Lie on your side on a mat or floor with your legs extended straight away from your body
- Hold your feet together and keep your lower arm bent and positioned under your head for support while the upper arm rests upon your upper hip
- Align your hips and shoulders vertically to the floor, and your head with your spine
- Exhale and gently raise the upper leg off the lower leg while keeping the knee extended and the foot in a neutral position; however, avoid flexion and extension. The hips should remain vertical to the floor and the knee of the raised leg should point straight away from you.
- Continue raising the leg until the hips begin to tilt upward or until you feel tension developing in your lower back or oblique muscles
- Inhale and slowly return your raised leg to your starting position in a controlled manner
3. Glute bridge single-leg progression
Here are the steps to do this exercise:
- Lie on your back in a bent-knee position with your feet hip-width apart and flat on the floor
- Rest your arms comfortably along your side with the palms rotated up to face the ceiling
- Lift the left leg and place both hands on the back of the thigh to gently pull your left knee toward your chest. Then, slide the right foot toward the center of the body for better balance.
- Contract your abdominal muscles gently to flatten your lower back into the floor
- Exhale while holding your abdominal contraction and the back of your left thigh
- Press your right foot into the ground and lift upward off the floor into hip extension by contracting your right glute
- Avoid pushing your hips too high and maintain your abdominal contraction to prevent excessive arching in your lower back
- Inhale and slowly lower yourself back to the starting position by controlling the action of the right hip
- Pick the toes of the right foot off of the floor during this exercise to hold the foot in dorsiflexion. This can help increase the strength of the muscles along the front of the shin. Doing this can help reduce the risk of developing shin splints.
- Exhale as you push your leg into the ground and inhale on the lowering phase
4. Inverted flyers
To do inverted flyers, you need to:
- Stand with feet hip-width apart
- Contract your abdominal/core muscles gently to stiffen your torso and stabilize your spine
- Pull your shoulders down and back without arching your lower back while keeping your arms hanging comfortably along your side
- Keep the right foot planted on the ground and lift the left knee so that it is straight in front of the hip and the hip is at a 90° angle
- Bend the arms to 90° angles. As you raise the left knee, swing the right arm forward to flex the right shoulder while swinging the left arm back to create shoulder extension.
- Maintain the abdominal bracing to keep the core stiff and the spine straight and lean forward on the right hip while simultaneously extending the left hip behind your body. At the same time, reach forward with the right arm to create right shoulder flexion and move the left elbow back to create left shoulder extension.
- Continue flexing forward on the right hip while reaching forward with the left arm and extending the right leg back into hip extension
- Find a spot on the floor and fix your gaze on that spot to help maintain balance. At the point where you feel your end range-of-motion while balanced on your right leg, reach forward with the left arm to fully extend the elbow while flexing the shoulder. At the same time, extend the left leg straight back to create a full hip extension. Point the toes of the left foot toward the wall behind you to move into a full extension of the left hip and concurrent flexion of the right hip.
- Continue to maintain abdominal bracing to ensure balance and stability. Try to keep the hips level and do not let the left hip drop toward the floor or roll away from the right leg. Hold this position for three to five seconds.
- Maintain abdominal bracing and begin to lean back into the right hip while pulling the left hip forward and the left arm back down toward your midsection
5. Glute activation lunges
Here’s the process to do glute activation lunges:
- Stand with your feet together and your arms raised in front to the shoulder height, with your elbows fully extended
- Pull your shoulders down and back without arching your lower back and engage your abdominal/core muscles to stiffen your spine
- Step out sideways with the right foot to the 3 o’clock position; here, both feet remain pointed forward. Once the foot is firmly placed on the floor, begin to bend at the hips, pushing them backward while simultaneously shifting your weight over that same foot.
- Continue shifting your weight until your tibia (shinbone) is vertical to the floor and your knee is aligned directly over the second toe of that foot. Your left leg should be near or at full extension while keeping the right foot flat. The heels of both feet should stay flat on the floor.
- Move your arms simultaneously and lean your torso in the opposite direction to the lunge movement, increasing the load on your glute muscle group. Firmly push off with your front leg, activating both your quadriceps and glutes to return to your upright, starting position.
- Step with one foot in front and across the body from the starting position; here, both feet remain pointed forward. Once the foot is firmly placed on the floor, begin to bend at the hips, pushing them backward while simultaneously shifting your weight over that same foot.
- Continue shifting your weight until your shinbone is vertical to the floor, and your knee is aligned directly over the second toe of that foot.
- Flex your opposite leg with the heel off the ground. Simultaneously, rotate your torso and arms in the opposite direction to the lunge movement, increasing the load on your gluteal muscle group.
- Push off with your front leg firmly, activating both your quadriceps and glutes to return to your upright, starting position
6. Walking abduction
To do the walking abduction workout, you need to place a resistance band under both feet, cross the hands, and grasp each handle at the hips. Step to the side, keeping both legs straight and the trunk strong and stable.
Stretches
Do a total of 60 seconds for each stretch. Make it a point to hold for 10–30 seconds during each repetition.
1. Child’s pose
To perform the child’s pose:
- Kneel on a yoga mat with both knees directly under your hips and the toes pointing behind you, with the big toes touching
- Begin to widen your knees toward the outside of the mat
- Stiffen your abdominal muscles to stabilize your spine and pull the shoulders down and back without arching your lower back
- Lean forward slowly, placing your hands on the ground and positioning them directly under your shoulders with your fingers facing forward, and inhale
- Keep your hands planted. Exhale and hinge at the hips, bringing your glutes to your heels. As you sit back, maintain the connection between your glutes and heels and extend through your back and arms.
- Pull the shoulders down and back, keeping them away from the ears
- Allow your chest to rest between your thighs and your forehead to rest on the floor
- Inhale as you lengthen the spine, extending through the upper body, and exhale as you fold deeper into the pose, widening the knees as needed
2. Kneeling hip-flexor stretch
Here’s the process to do this workout:
- Place the left knee on the floor or yoga mat directly under the left hip from a kneeling position.
- Place the right foot in front of the right hip, so that the right knee is directly over the right ankle and the right hip is flexed to 90°.
- Place both hands gently on the right thigh to help maintain a straight, tall spine.
- Pull your shoulders down and back without arching your lower back and engage your abdominal/core muscles to stiffen your spine and keep your pelvis level and stable.
- Lean forward into your right hip while keeping your left knee pressed into the ground.
- Do not allow your pelvis to rotate forward. To increase the stretch to the left hip flexors, squeeze and contract the left glute muscles.
- Try to move into the stretch a little deeper with each repetition, but be sure to keep your core braced to not allow the pelvis to rotate and lose the stretch.
- Complete all repetitions on one side before alternating to the other hip.
- Raise the left arm straight in the air and tilt slightly to the right side to increase the intensity of the stretch, as you lean forward into the right hip.
- Keep the abdominals engaged throughout the entire stretch. This will ensure that the pelvis remains level and provides the greatest results from the stretch.
3. Leg crossover stretch
To do the leg-crossover stretch, you need to:
- Lie flat on your back on the floor or yoga mat in a bent-knee position
- Outstretch your arms to the sides and ensure that the palms are facing upwards
- Stiffen your abdominal muscles to stabilize your spine and pull your shoulders back and down without moving your trunk
- Cross one leg over the other, resting your ankle over the opposite knee
- Exhale gently and slowly press the knee of the crossed leg away from your body without moving your hips or trunk until you reach the point of tension
- Avoid bouncing or pushing to the point of pain. You may also use your hand to push the crossed knee away from you.
- Hold this position for a moment. Then, slowly rotate your hips toward the floor, bringing the sole of the elevated foot to rest firmly on the floor.
- Avoid any rotation through your trunk or arching in your lower back. Hold this position for 15 to 30 seconds. After that, relax and return to your starting position.
If you are a runner suffering from hip imbalances, then performing these exercises will be useful in the long run.
References
1. American Council on Exercise. Medical Exercise Specialist Manual. San Diego: American Council on Exercise, 2015.
2. Bramah C, Precee SJ, Gill N, et al. Is There a Pathological Gait Associated with Common Soft Tissue Running Injuries? Am J Sports Med 2018; 46: 3023-31.
3. Fredericson M, Cookingham CL, Chaudhari AM, et al. Hip abductor weakness in distance runners with iliotibial band syndrome. Clin J Sports Med 2000; 10: 169-75.
Recommended